This PR will remain in draft as a preview of upcoming documentation
changes for 4.82.0

---------

Co-authored-by: Jordan Montgomery <elijah.jordan.montgomery@gmail.com>
Co-authored-by: Marko Lisica <83164494+marko-lisica@users.noreply.github.com>
Co-authored-by: Magnus Jensen <magnus@fleetdm.com>
Co-authored-by: Victor Lyuboslavsky <2685025+getvictor@users.noreply.github.com>
Co-authored-by: Noah Talerman <47070608+noahtalerman@users.noreply.github.com>
Co-authored-by: Dante Catalfamo <43040593+dantecatalfamo@users.noreply.github.com>
Co-authored-by: melpike <79950145+melpike@users.noreply.github.com>
Co-authored-by: Mike Thomas <78363703+mike-j-thomas@users.noreply.github.com>
Co-authored-by: Nico <32375741+nulmete@users.noreply.github.com>
Co-authored-by: Scott Gress <scottmgress@gmail.com>
18 KiB
Single sign-on (SSO)
Fleet supports Okta, authentik, Google Workspace, and Microsoft Active Directory (AD) / Entra ID, as well as any other identity provider (IdP) that supports the SAML standard.
To configure SSO, follow steps for your IdP and then complete Fleet configuration.
JIT? SAML implementation supports just-in-time (JIT) user provisioning, as well as both IdP-initiated login and service-initiated (SP) login.
Okta
Create a new SAML app in Okta:
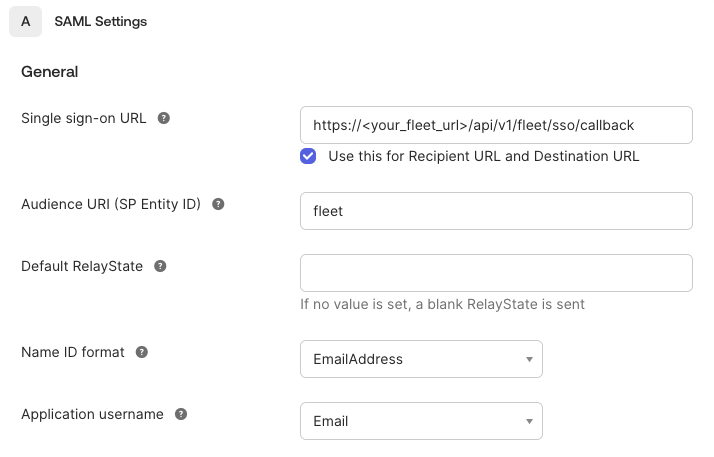
If you're configuring end user authentication, use https://<your_fleet_url>/api/v1/fleet/mdm/sso/callback for the Single sign on URL instead.
Once configured, you will need to retrieve the issuer URI from View Setup Instructions and metadata URL from the Identity Provider metadata link within the application Sign on settings. See below for where to find them:
Note that while setting up the SAML app in Okta, the Entity ID is called "Audience URI (SP Entity ID)", but after the app is set up, Okta labels this as "Audience Restriction".
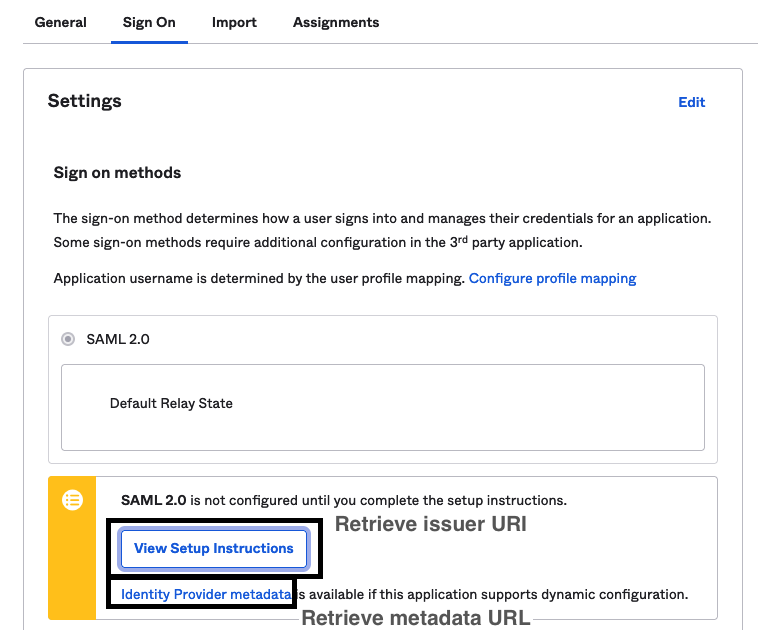
The Provider Sign-on URL within View Setup Instructions has a similar format as the Provider SAML Metadata URL, but this link provides a redirect to sign into the application, not the metadata necessary for dynamic configuration.
Google Workspace
If you're configuring end user authentication, use https://<your_fleet_url>/api/v1/fleet/mdm/sso/callback for the Single sign on URL instead.
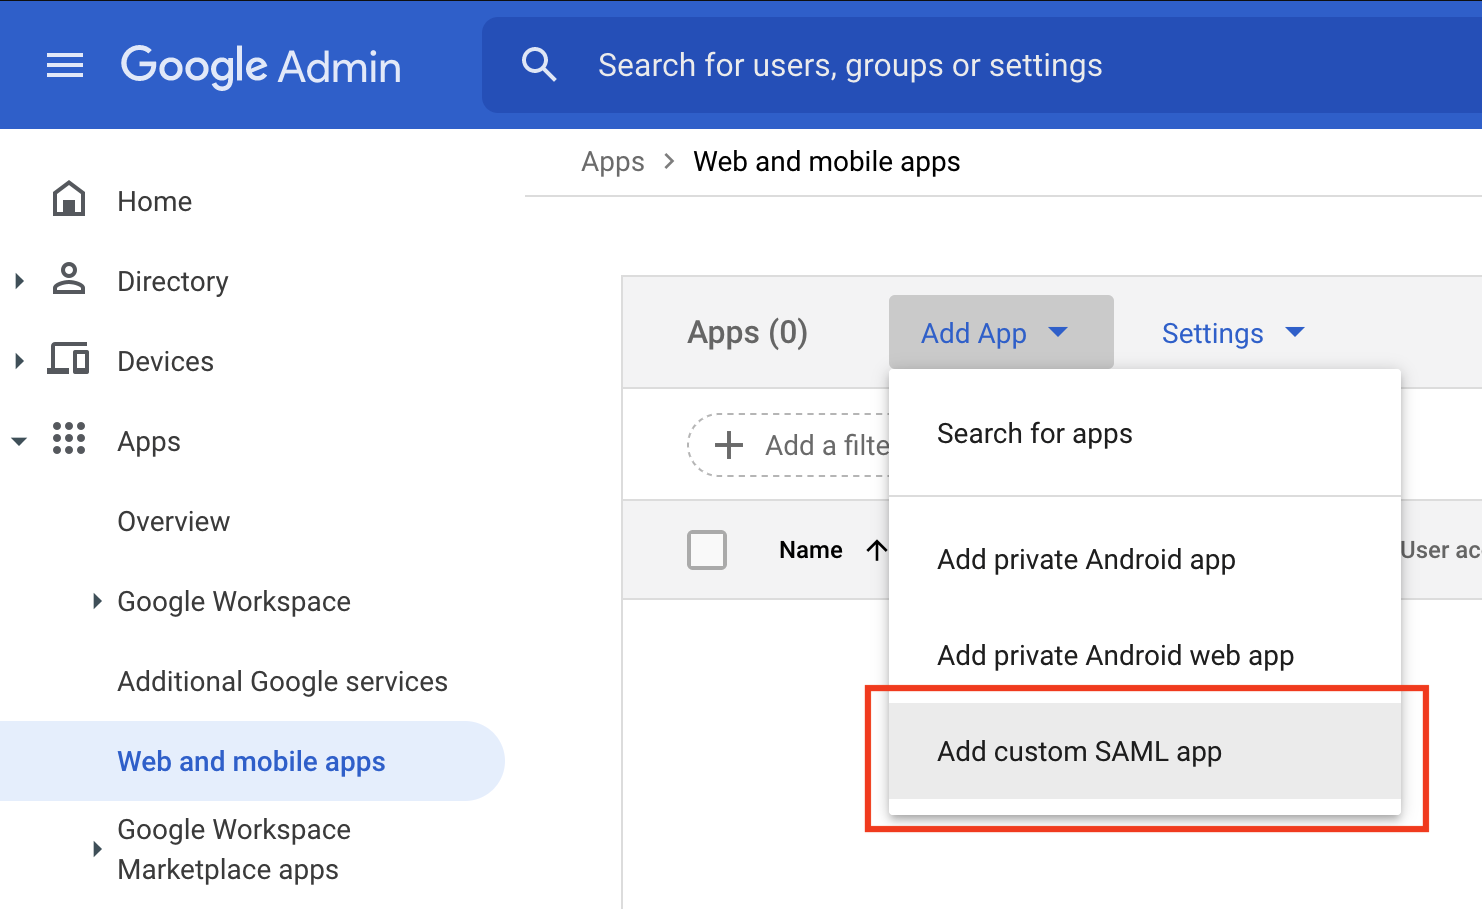
Create a new SAML app in Google Workspace:
- Navigate to the Web and Mobile Apps section of the Google Workspace dashboard. Click Add App -> Add custom SAML app.
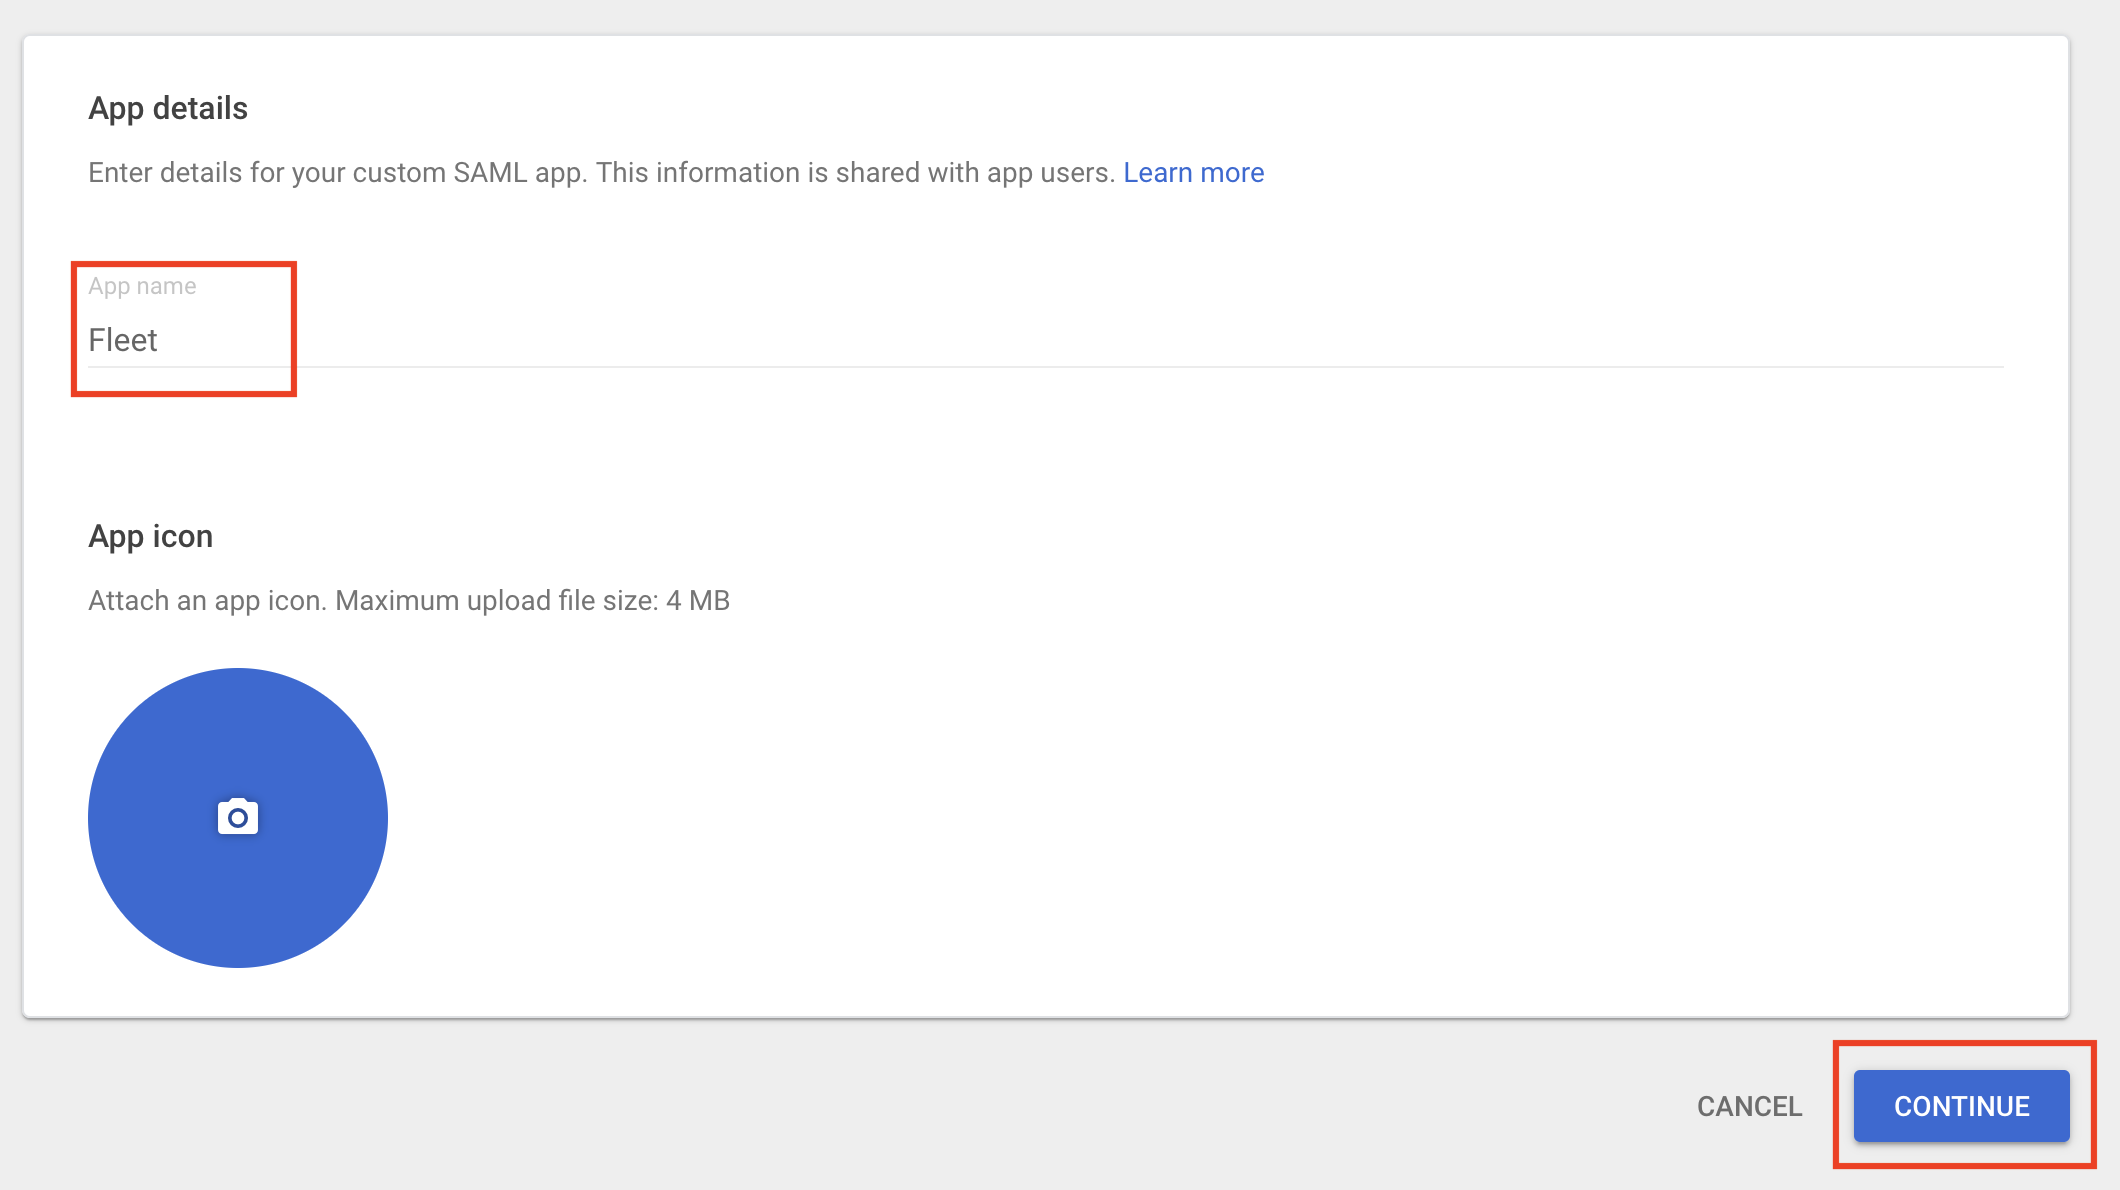
- Enter "Fleet" for the App name and click Continue.
- Click Download Metadata, saving the metadata to your computer. Click Continue.

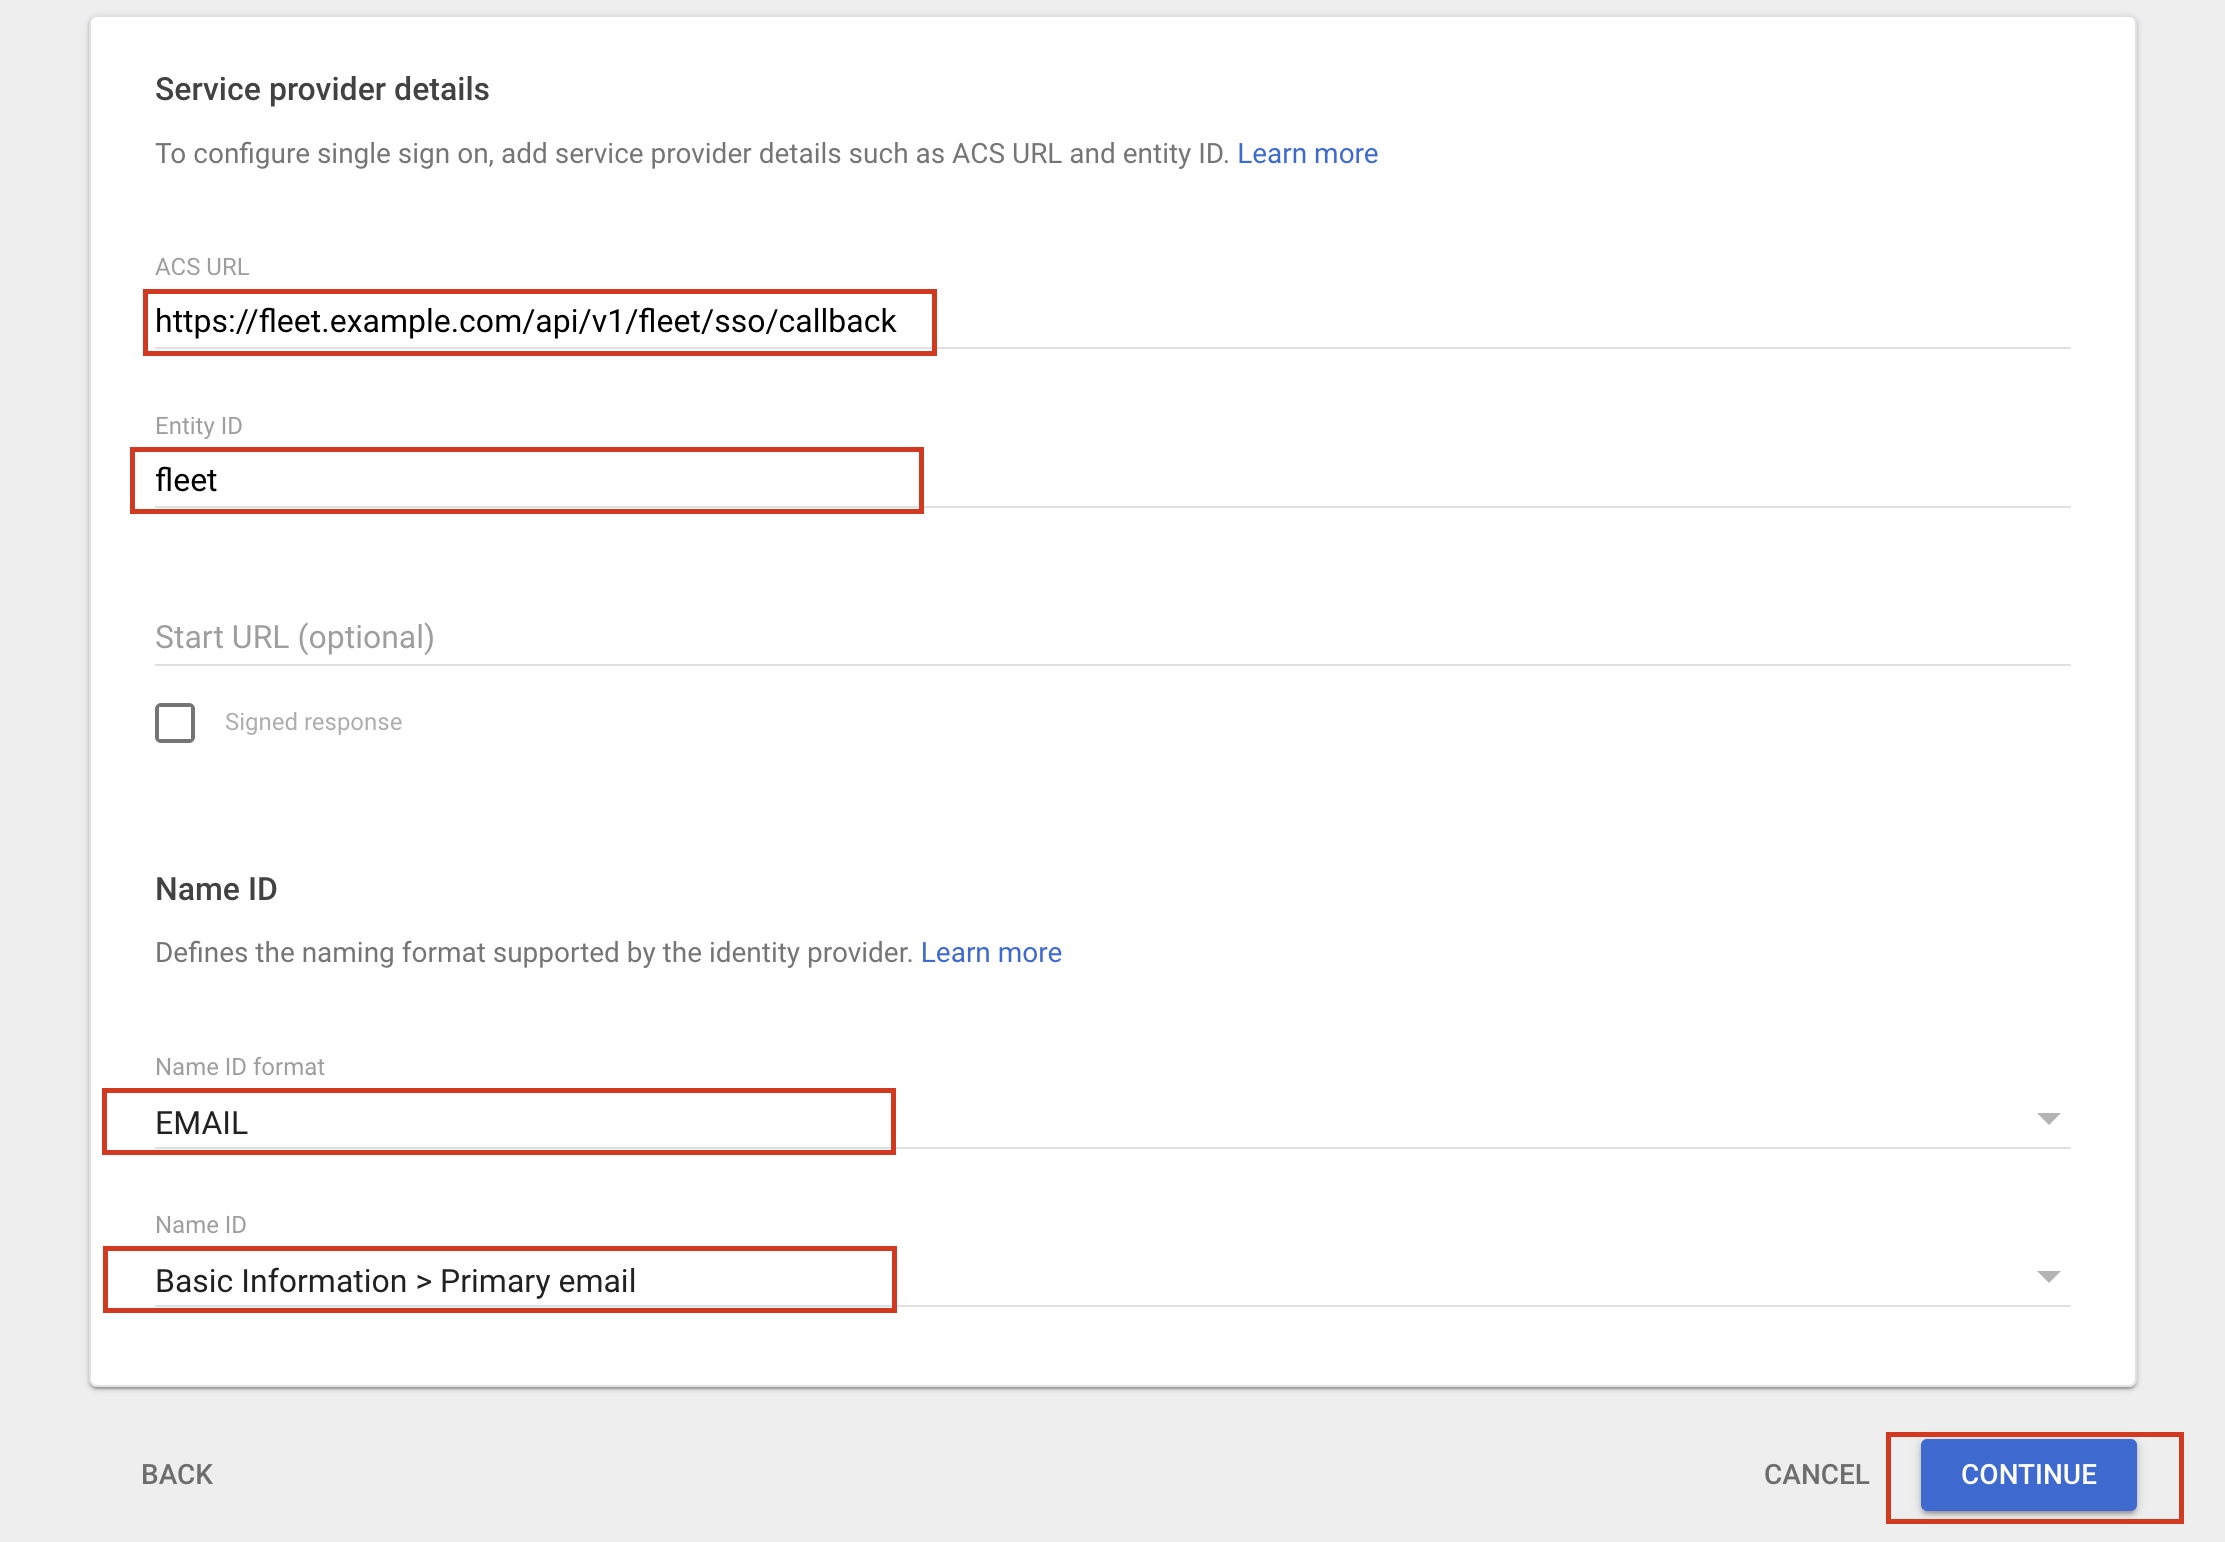
- Configure the Service provider details:
- For ACS URL, use
https://<your_fleet_url>/api/v1/fleet/sso/callback. If you're configuring end user authentication, usehttps://<your_fleet_url>/api/v1/fleet/mdm/sso/callbackinstead. - For Entity ID, use the same unique identifier as you'll use in Fleet (e.g.,
fleet). - For Name ID format, choose
EMAIL. - For Name ID, choose
Basic Information > Primary email. - All other fields can be left blank.
- For ACS URL, use
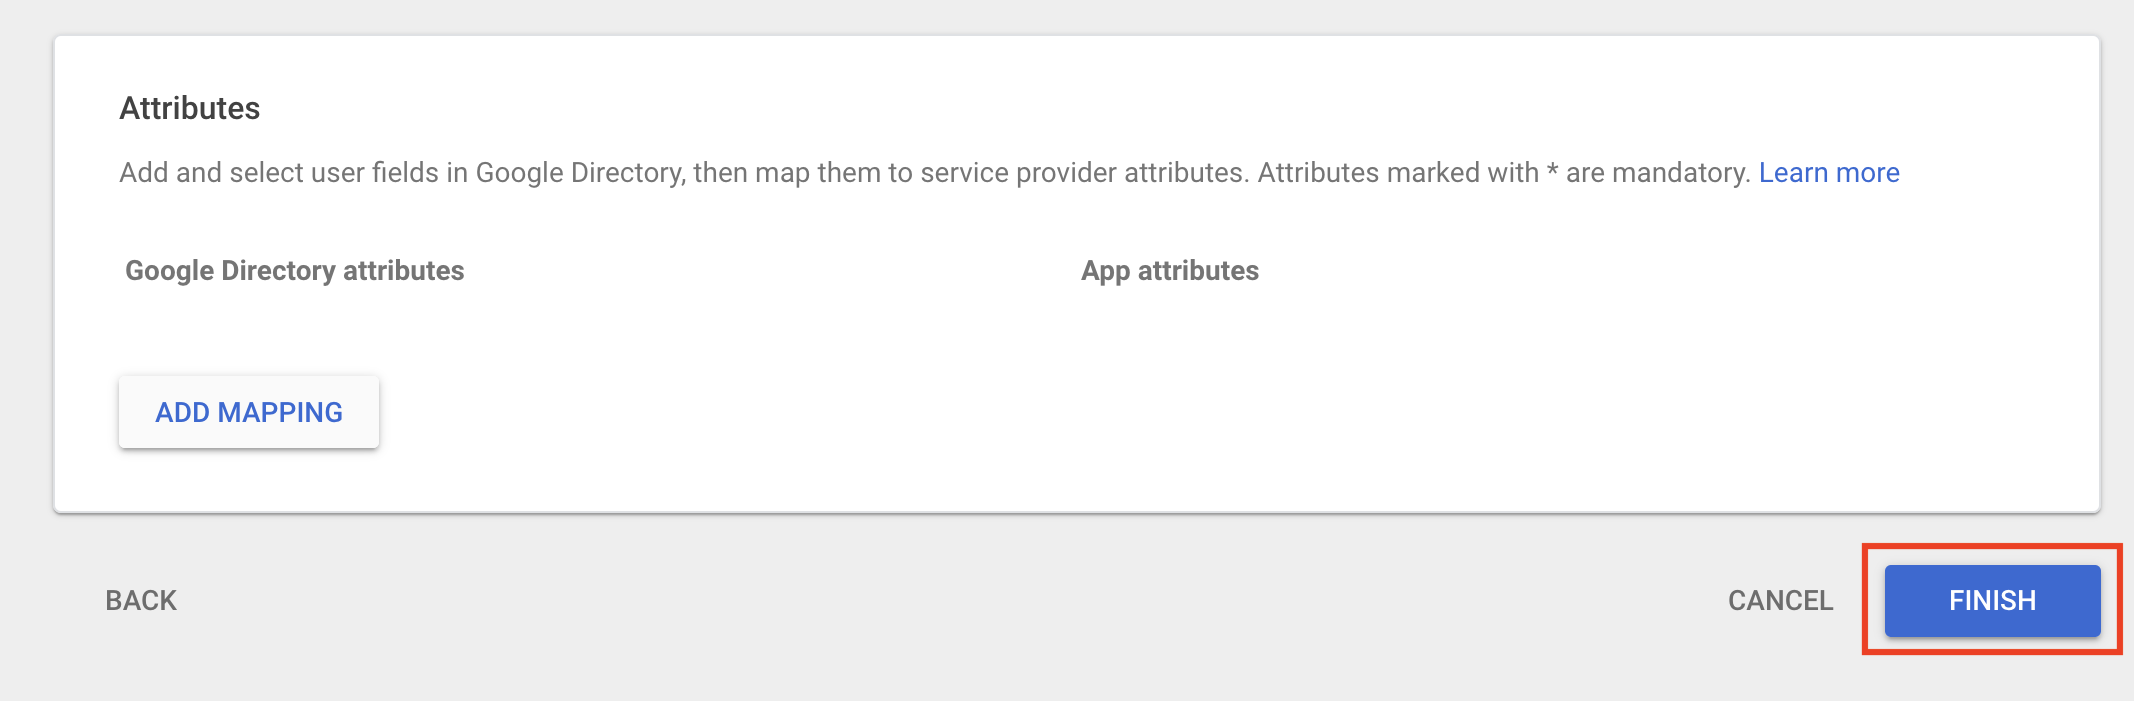
Click Continue at the bottom of the page.
- Click Finish.
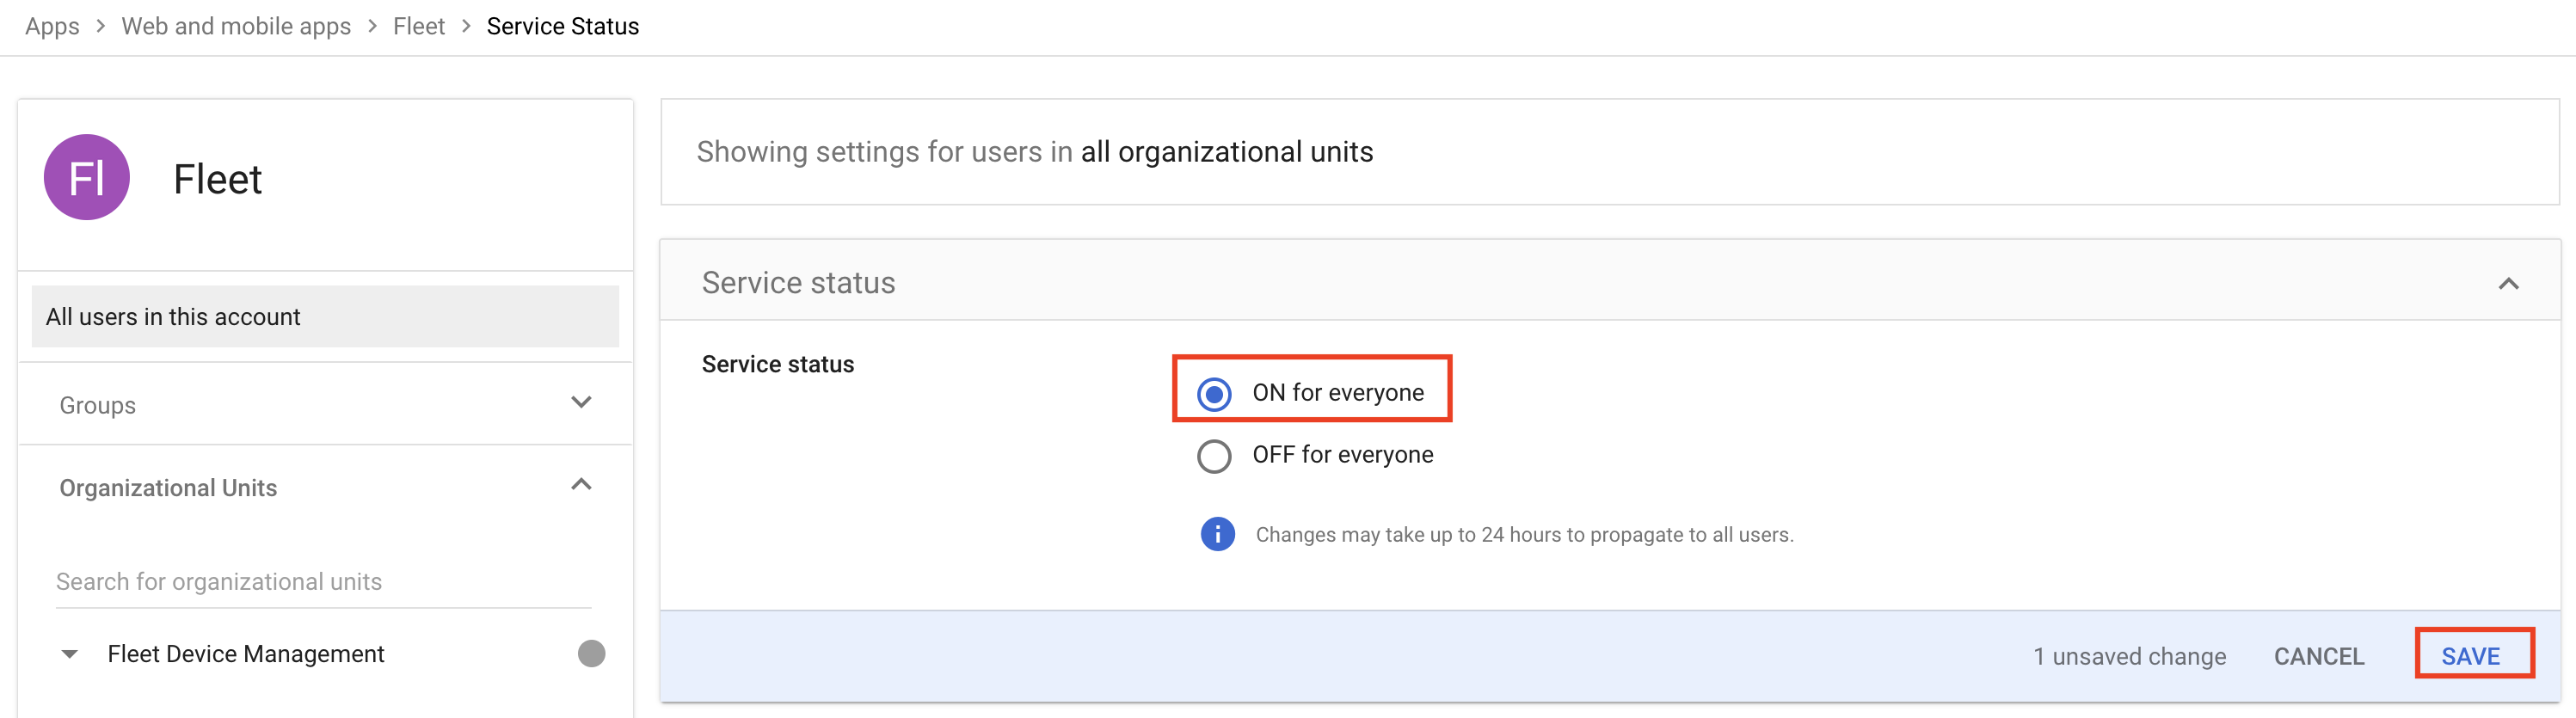
- Click the down arrow on the User access section of the app details page.
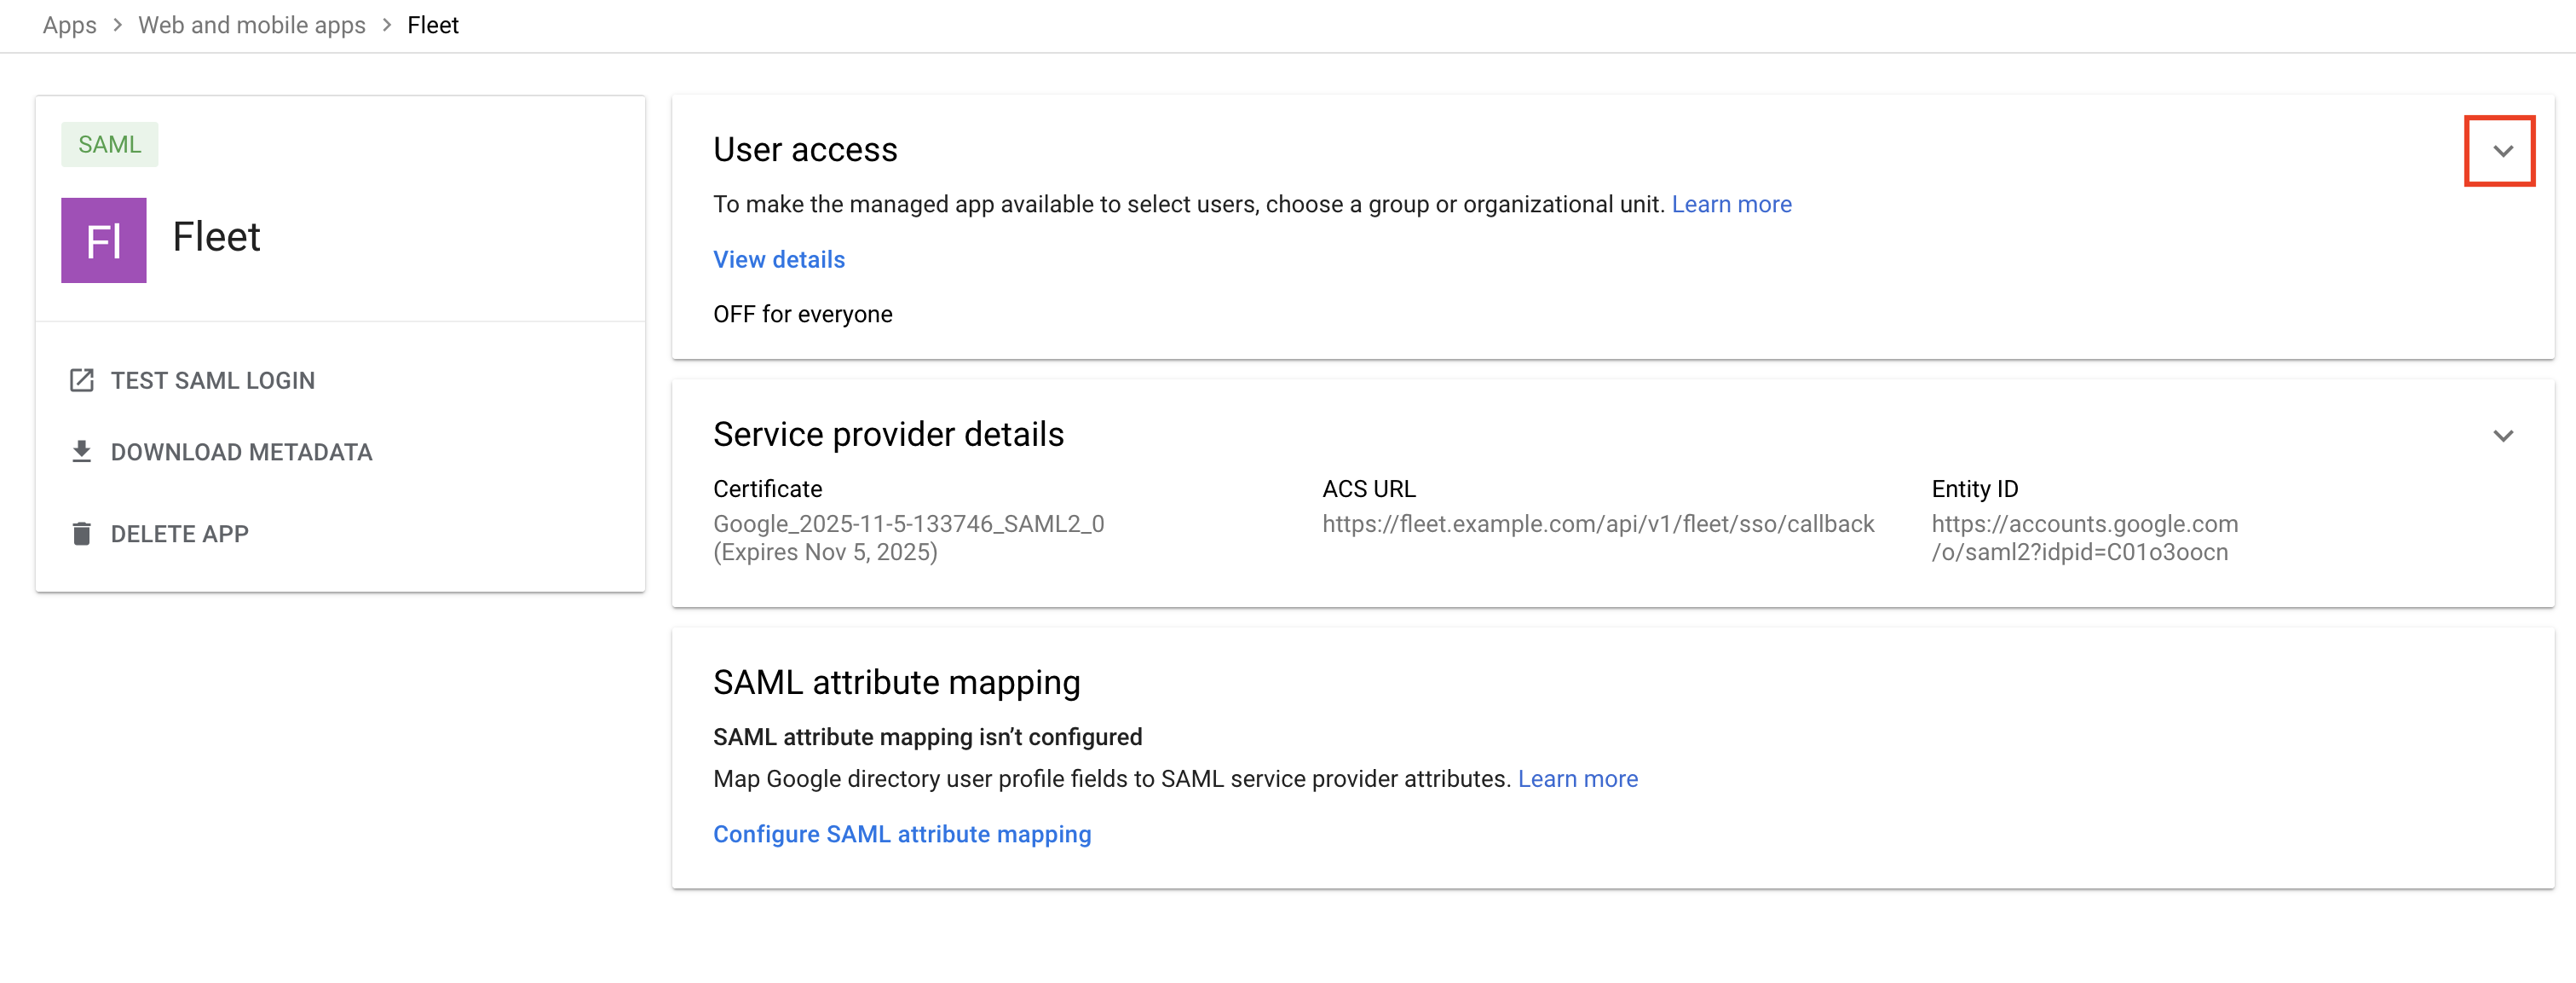
- Check ON for everyone. Click Save.
- Enable SSO for a test user and try logging in. Note that Google sometimes takes a long time to propagate the SSO configuration, and it can help to try logging in to Fleet with an Incognito/Private window in the browser.
Entra
Create a new SAML app in Microsoft Entra Admin Center:
- From the left sidebar, navigate to Applications > Enterprise Applications.
- At the top of the page, click + New Application.
- On the next page, click + Create your own application and enter the following.
- For Input name, enter
Fleet. - For What are you looking to do with your application?, select
Integrate any other application you don't find in the gallery (Non-gallery). - Click Create.
- For Input name, enter
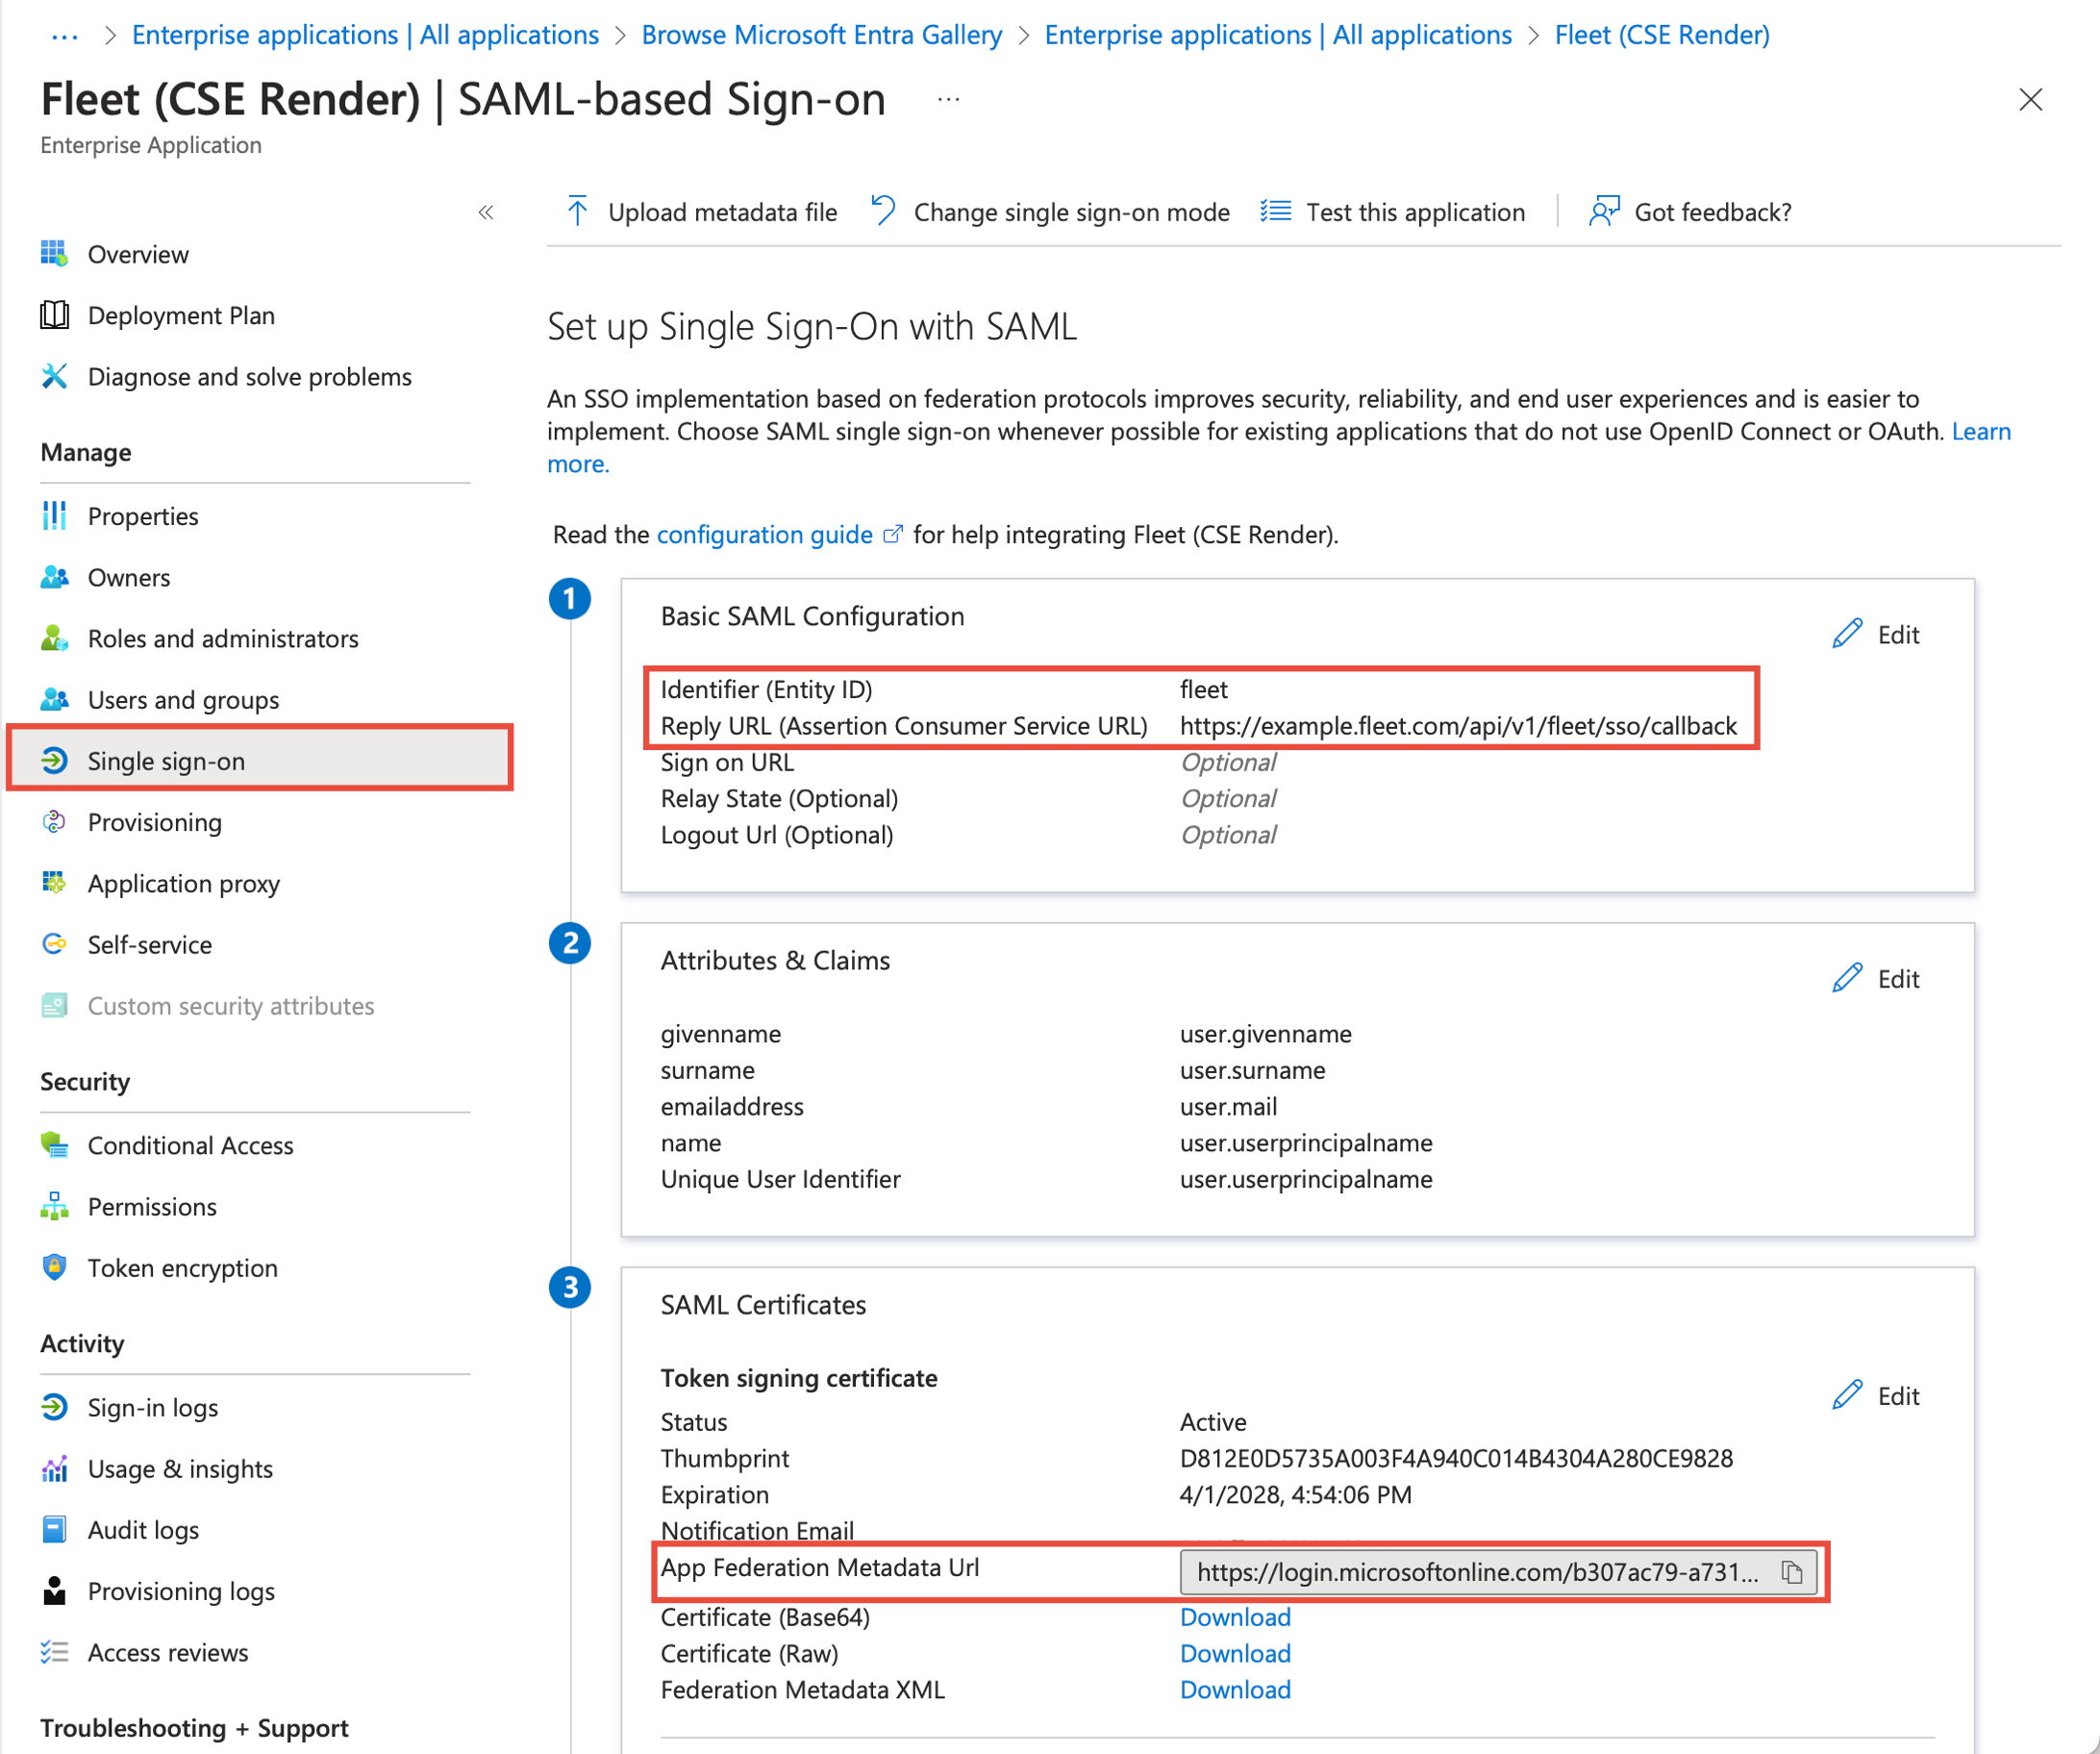
- In your newly crated Fleet app, select Single sign-on from the menu on the left. Then, on the Single sign-on page, select SAML.
- Click the Edit button in the (1) Basic SAML Configuration Box.
- For Identifier (Entity ID), click Add identifier and enter
fleet. - For Reply URL (Assertion Consumer Service URL), enter
https://<your_fleet_url>/api/v1/fleet/sso/callback. If you're configuring end user authentication, usehttps://<your_fleet_url>/api/v1/fleet/mdm/sso/callbackinstead. - Click Save.
- For Identifier (Entity ID), click Add identifier and enter
- In the (3) SAML Certificates box, click the copy button in the App Federation Metadata Url field.
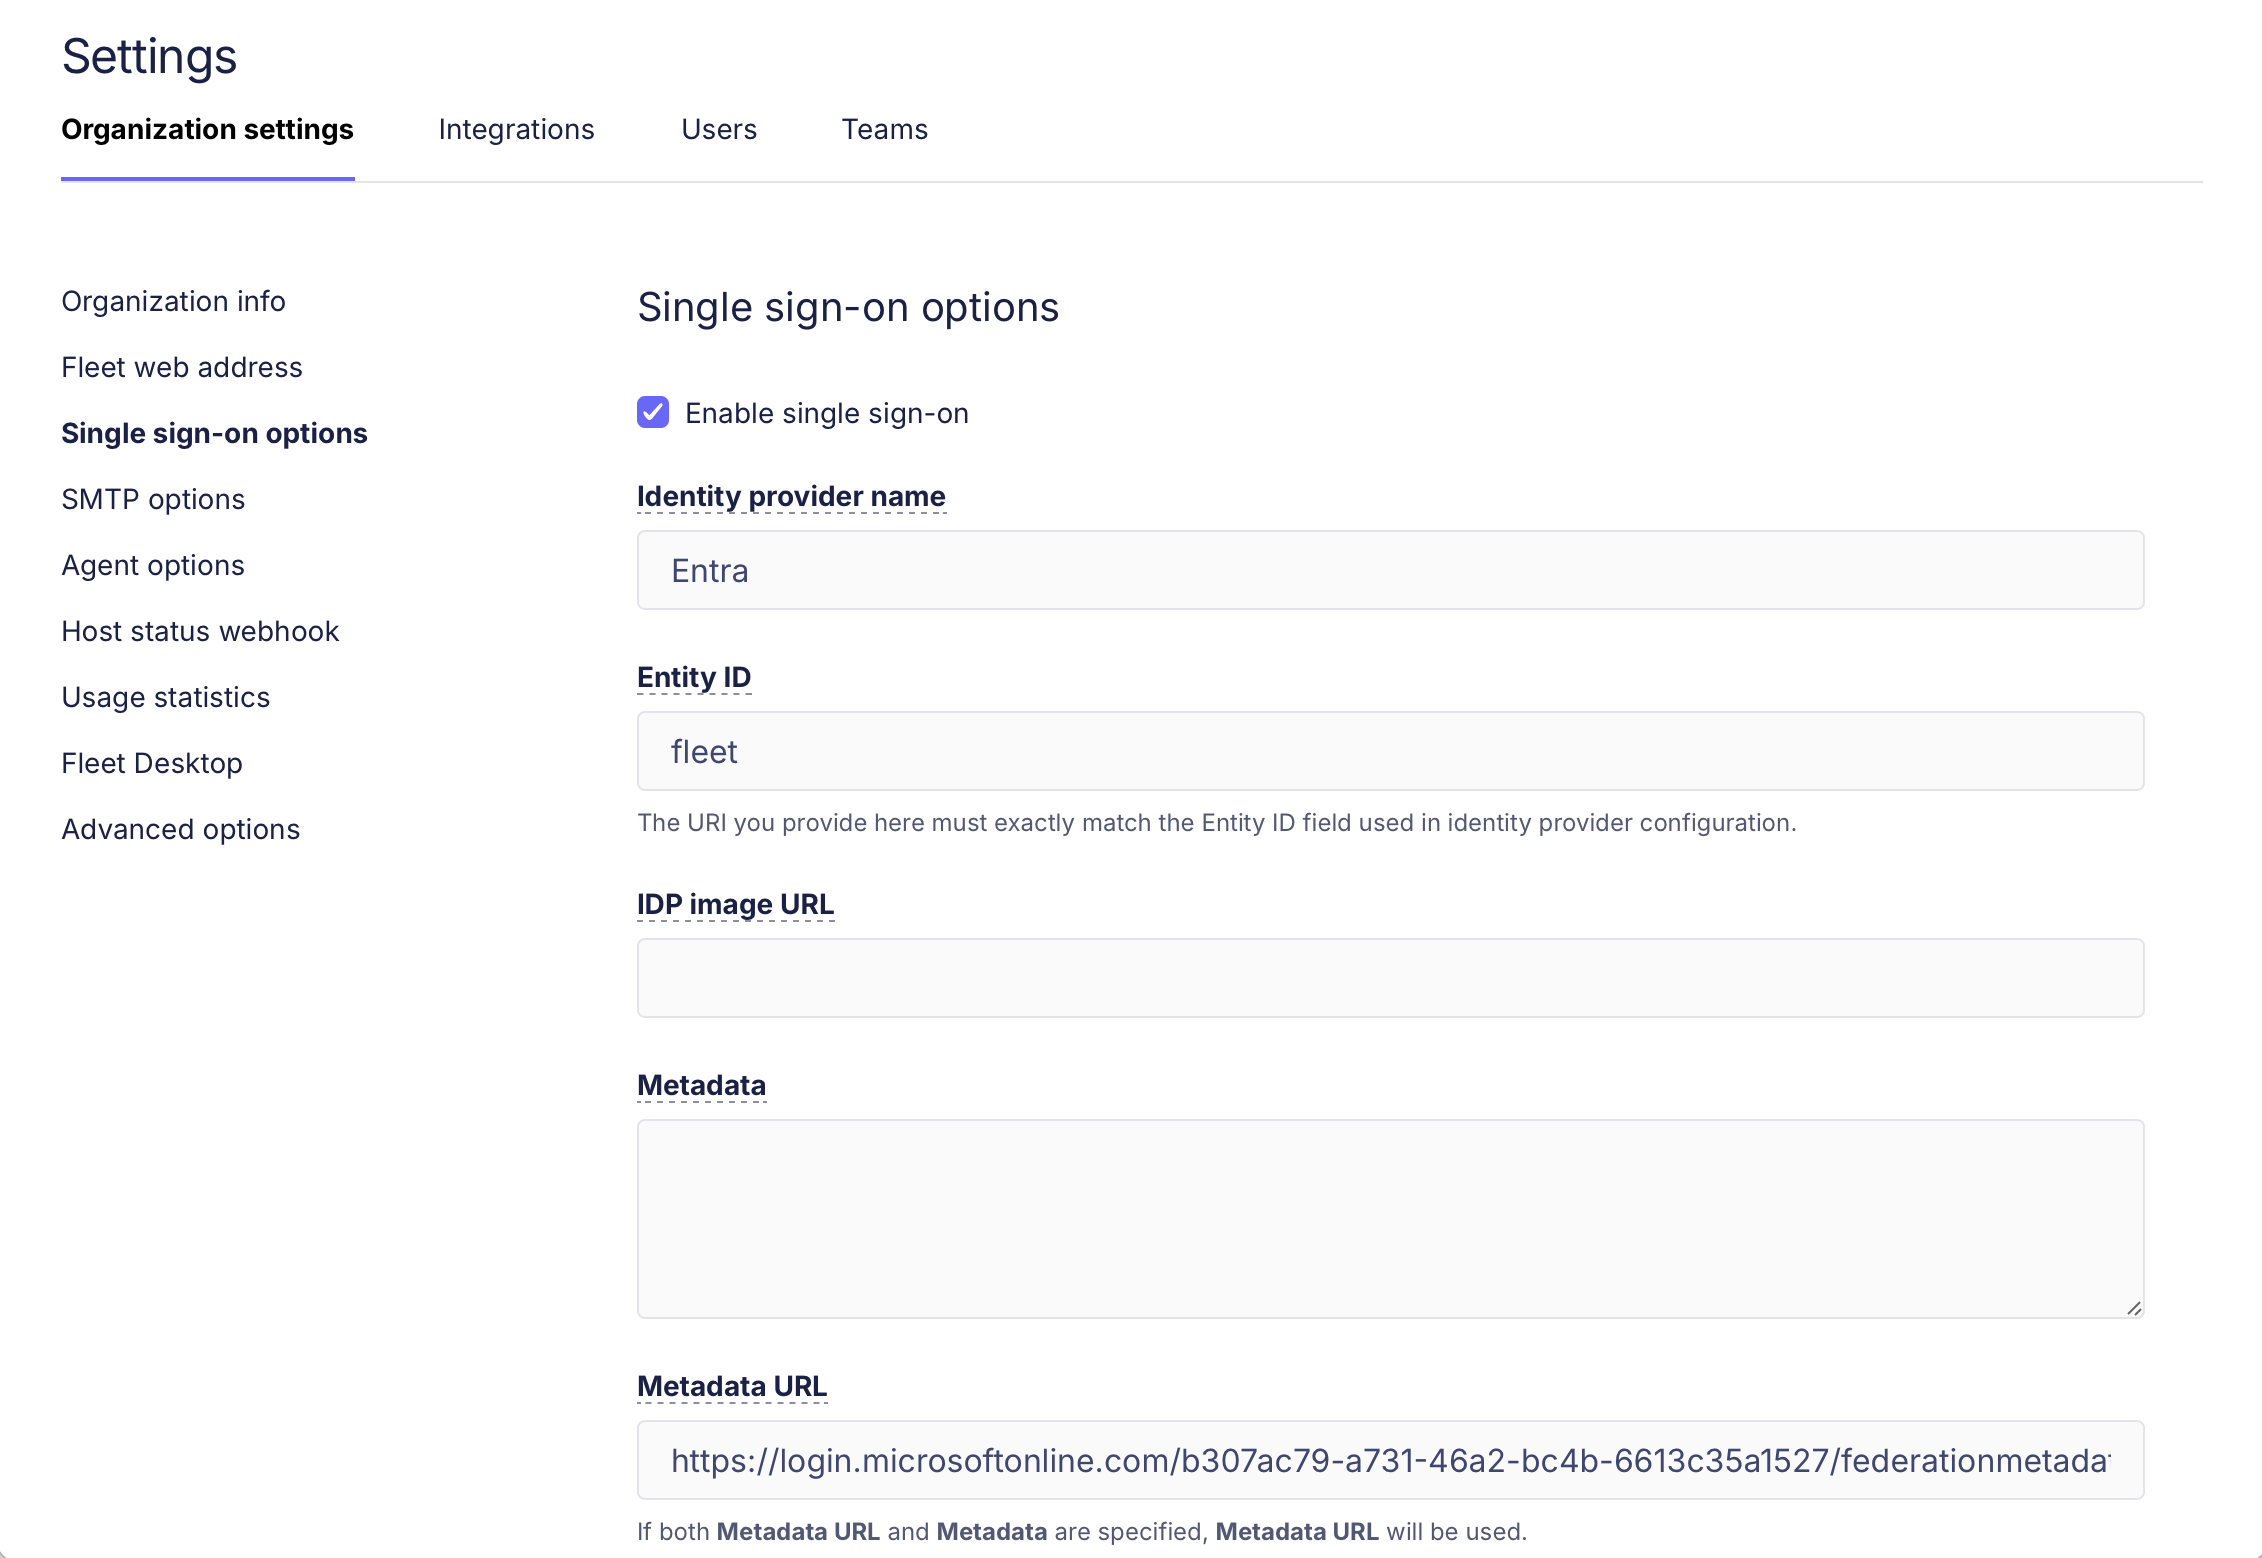
On your Fleet server:
- Navigate to Settings > Organization settings > Single sign-on (SSO).
- On the Single sign-on (SSO) page:
- Check the box to Enable single sign-on.
- For Identity provider name, enter
Entra. - For Entity ID, enter
fleet. - In the Metadata URL field, paste the URL that you copied from Entra in step 6 in the previous section.
- Click Save.
 3. Enable SSO for a test user and try to log in with Entra.
- Click the Account icon in the top right and select Users.
- Select a test user and choose Actions > Edit.
- Under Authentication, select Single sign-on and save.
3. Enable SSO for a test user and try to log in with Entra.
- Click the Account icon in the top right and select Users.
- Select a test user and choose Actions > Edit.
- Under Authentication, select Single sign-on and save.
authentik
Fleet can be configured to use authentik as an identity provider. To continue, you will need to have an authentik instance hosted on an HTTPS domain, and an admin account.
-
Log in to authentik and click Admin interface.
-
Navigate to Applications -> Applications and click Create with Provider to create an application and provider pair.
-
Enter "Fleet" for the App name and click Next.
-
Choose SAML as the Provider Type and click Next.
- For Name, enter "Fleet".
- For Authorization flow, choose
default-provider-authorization-implicit-consent (Authorize Application). - In the Protocol settings section, configure the following:
- For Assertion Consumer Service URL use
https://<your_fleet_url>/api/v1/fleet/sso/callback.- If you're configuring end user authentication, use
https://<your_fleet_url>/api/v1/fleet/mdm/sso/callback.
- If you're configuring end user authentication, use
- For Issuer, use
authentik. - For Service Provider Binding, choose
Post. - For audience, use
https://<your_fleet_url>.
- For Assertion Consumer Service URL use
- In the Advanced protocol settings section, configure the following:
- Choose a signing certificate and enable Sign assertions and Sign responses.
- For NameID Property Mapping, choose
default SAML Mapping: Email.
- Click Next.
- Continue to the Review and Submit Application page and click Submit.
-
Navigate to Applications -> Providers and click on the Fleet provider you just created.
- In the Related objects section, click Copy Metadata URL and paste the URL to a text editor for later use.
-
Proceed to Fleet configuration.
Other IdPs
IdPs generally requires the following information:
-
Assertion Consumer Service - This is the call-back URL that the identity provider will use to send security assertions to Fleet. Use
https://<your_fleet_url>/api/v1/fleet/sso/callback. If you're configuring end user authentication, usehttps://<your_fleet_url>/api/v1/fleet/mdm/sso/callbackinstead. -
Entity ID - This value is an identifier that you choose. It identifies your Fleet instance as the service provider that issues authorization requests. The value must match the Entity ID that you define in the Fleet SSO configuration. In the other examples, we used
fleet. -
Name ID Format - The value should be
urn:oasis:names:tc:SAML:1.1:nameid-format:emailAddress. This may be shortened in the IdP setup to something likeemailorEmailAddress. -
Subject Type -
email.
After supplying the above information, your IdP will generate an issuer URI and metadata that will be used to configure Fleet as a service provider.
Service provider metadata
Fleet doesn't generate SP metadata XML files. Most major identity providers (like Okta, Microsoft Entra ID, and Google Workspace) work without this file. You can configure SSO by entering Fleet's details directly in your IdP.
If your IdP requires an SP metadata XML file, you can generate one using a third-party tool like SAMLTool.com's SP Metadata XML Builder.
You'll need to enter the Assertion Consumer Service URL, Entity ID, and Name ID Format values.
After generating the XML file, upload it to your identity provider according to their documentation.
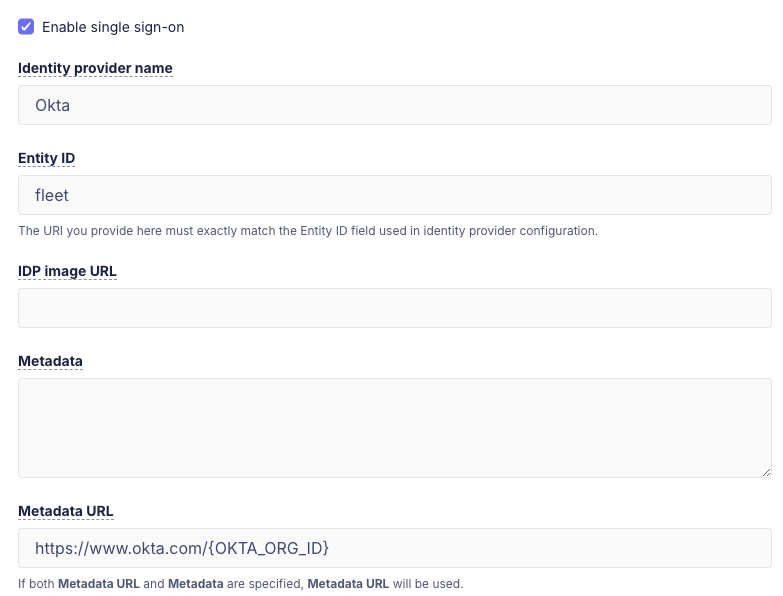
Fleet configuration
To configure SSO in Fleet head to Settings > Integrations > Single sign-on (SSO) > Fleet users.
If you're configuring end user authentication head to Settings > Integrations > Single sign-on (SSO) > End users.
-
Identity provider name - A human-readable name of the IdP. This is rendered on the login page.
-
Entity ID - A URI that identifies your Fleet instance as the issuer of authorization requests (e.g.,
fleet). This must match the Entity ID configured with the IdP. -
Metadata URL - Obtain this value from your IdP. and is used by Fleet to issue authorization requests to the IdP.
-
Metadata - If the IdP does not provide a metadata URL, the metadata must be obtained from the IdP and entered.
Just-in-time (JIT) user provisioning
Applies only to Fleet Premium
Fleet can automatically create users using just-in-time (JIT) provisioning. To enable this, go to Settings > Integrations > Single sign-on (SSO) > Fleet users and check Create user and sync permissions on login.
When enabled, Fleet will automatically create an account when a user logs in for the first time with the configured SSO. The new account's email and full name are copied from the user data in the SSO response.
By default, accounts created via JIT provisioning are assigned the Global Observer role. To assign different roles for accounts created via JIT provisioning, see customization of user roles below.
For this to work correctly make sure that:
- Your IdP is configured to send the user email as the Name ID (instructions for configuring different providers are detailed below)
- Your IdP sends the full name of the user as an attribute with any of the following names (if this value is not provided, Fleet will fall back to the user email)
namedisplaynamecnurn:oid:2.5.4.3http://schemas.xmlsoap.org/ws/2005/05/identity/claims/name
Customization of user roles
Note: This feature requires setting
sso_settings.enable_jit_provisioningtotrue.
Users created via JIT provisioning can be assigned Fleet roles using SAML custom attributes that are sent by the IdP in SAMLResponses during login.
Fleet will attempt to parse SAML custom attributes with the following format:
FLEET_JIT_USER_ROLE_GLOBAL: Specifies the global role to use when creating the user.FLEET_JIT_USER_ROLE_TEAM_<TEAM_ID>: Specifies fleet role for fleet with ID<TEAM_ID>to use when creating the user.
Currently supported values for the above attributes are: admin, maintainer, observer, observer_plus, technician and null.
A role attribute with value null will be ignored by Fleet. (This is to support limitations on some IdPs which do not allow you to choose what keys are sent to Fleet when creating a new user.)
SAML supports multi-valued attributes, Fleet will always use the last value.
NOTE: Setting both FLEET_JIT_USER_ROLE_GLOBAL and FLEET_JIT_USER_ROLE_TEAM_<TEAM_ID> will cause an error during login as Fleet users cannot be Global users and belong to fleets.
Following is the behavior that will take place on every SSO login:
If the account does not exist then:
- If the
SAMLResponsehas any role attributes then those will be used to set the account roles. - If the
SAMLResponsedoes not have any role attributes set, then Fleet will default to use theGlobal Observerrole.
If the account already exists:
- If the
SAMLResponsehas any role attributes then those will be used to update the account roles. - If the
SAMLResponsedoes not have any role attributes set, no role change is attempted.
Here's a SAMLResponse sample to set the role of SSO users to Global admin:
[...]
<saml2:Assertion ID="id16311976805446352575023709" IssueInstant="2023-02-27T17:41:53.505Z" Version="2.0" xmlns:saml2="urn:oasis:names:tc:SAML:2.0:assertion" xmlns:xs="http://www.w3.org/2001/XMLSchema">
  <saml2:Issuer Format="urn:oasis:names:tc:SAML:2.0:nameid-format:entity" xmlns:saml2="urn:oasis:names:tc:SAML:2.0:assertion">http://www.okta.com/exk8glknbnr9Lpdkl5d7</saml2:Issuer>
  [...]
  <saml2:Subject xmlns:saml2="urn:oasis:names:tc:SAML:2.0:assertion">
    <saml2:NameID Format="urn:oasis:names:tc:SAML:1.1:nameid-format:emailAddress">bar@foo.example.com</saml2:NameID>
    <saml2:SubjectConfirmation Method="urn:oasis:names:tc:SAML:2.0:cm:bearer">
      <saml2:SubjectConfirmationData InResponseTo="id1Juy6Mx2IHYxLwsi" NotOnOrAfter="2023-02-27T17:46:53.506Z" Recipient="https://foo.example.com/api/v1/fleet/sso/callback"/>
    </saml2:SubjectConfirmation>
  </saml2:Subject>
  [...]
  <saml2:AttributeStatement xmlns:saml2="urn:oasis:names:tc:SAML:2.0:assertion">
    <saml2:Attribute Name="FLEET_JIT_USER_ROLE_GLOBAL" NameFormat="urn:oasis:names:tc:SAML:2.0:attrname-format:unspecified">
      <saml2:AttributeValue xmlns:xs="http://www.w3.org/2001/XMLSchema" xmlns:xsi="http://www.w3.org/2001/XMLSchema-instance" xsi:type="xs:string">admin</saml2:AttributeValue>
    </saml2:Attribute>
  </saml2:AttributeStatement>
</saml2:Assertion>
[...]
Here's a SAMLResponse sample to set the role of SSO users to observer in fleet with ID 1 and maintainer in fleet with ID 2:
[...]
<saml2:Assertion ID="id16311976805446352575023709" IssueInstant="2023-02-27T17:41:53.505Z" Version="2.0" xmlns:saml2="urn:oasis:names:tc:SAML:2.0:assertion" xmlns:xs="http://www.w3.org/2001/XMLSchema">
  <saml2:Issuer Format="urn:oasis:names:tc:SAML:2.0:nameid-format:entity" xmlns:saml2="urn:oasis:names:tc:SAML:2.0:assertion">http://www.okta.com/exk8glknbnr9Lpdkl5d7</saml2:Issuer>
  [...]
  <saml2:Subject xmlns:saml2="urn:oasis:names:tc:SAML:2.0:assertion">
    <saml2:NameID Format="urn:oasis:names:tc:SAML:1.1:nameid-format:emailAddress">bar@foo.example.com</saml2:NameID>
    <saml2:SubjectConfirmation Method="urn:oasis:names:tc:SAML:2.0:cm:bearer">
      <saml2:SubjectConfirmationData InResponseTo="id1Juy6Mx2IHYxLwsi" NotOnOrAfter="2023-02-27T17:46:53.506Z" Recipient="https://foo.example.com/api/v1/fleet/sso/callback"/>
    </saml2:SubjectConfirmation>
  </saml2:Subject>
  [...]
  <saml2:AttributeStatement xmlns:saml2="urn:oasis:names:tc:SAML:2.0:assertion">
    <saml2:Attribute Name="FLEET_JIT_USER_ROLE_TEAM_1" NameFormat="urn:oasis:names:tc:SAML:2.0:attrname-format:unspecified">
      <saml2:AttributeValue xmlns:xs="http://www.w3.org/2001/XMLSchema" xmlns:xsi="http://www.w3.org/2001/XMLSchema-instance" xsi:type="xs:string">observer</saml2:AttributeValue>
    </saml2:Attribute>
    <saml2:Attribute Name="FLEET_JIT_USER_ROLE_TEAM_2" NameFormat="urn:oasis:names:tc:SAML:2.0:attrname-format:unspecified">
      <saml2:AttributeValue xmlns:xs="http://www.w3.org/2001/XMLSchema" xmlns:xsi="http://www.w3.org/2001/XMLSchema-instance" xsi:type="xs:string">maintainer</saml2:AttributeValue>
    </saml2:Attribute>
  </saml2:AttributeStatement>
</saml2:Assertion>
[...]
Each IdP will have its own way of setting these SAML custom attributes, here are instructions for how to set it for Okta: https://support.okta.com/help/s/article/How-to-define-and-configure-a-custom-SAML-attribute-statement?language=en_US.
Email two-factor authentication (2FA)
If you have a "break glass" Fleet user account that's used to login to Fleet when your identify provider (IdP) goes down, you can enable email 2FA, also known as multi-factor authentication (MFA), for this user. For all other users, the best practice is to enable single-sign on (SSO). Then, you can enforce any 2FA method supported by your IdP (i.e. authenticator app, security key, etc.).
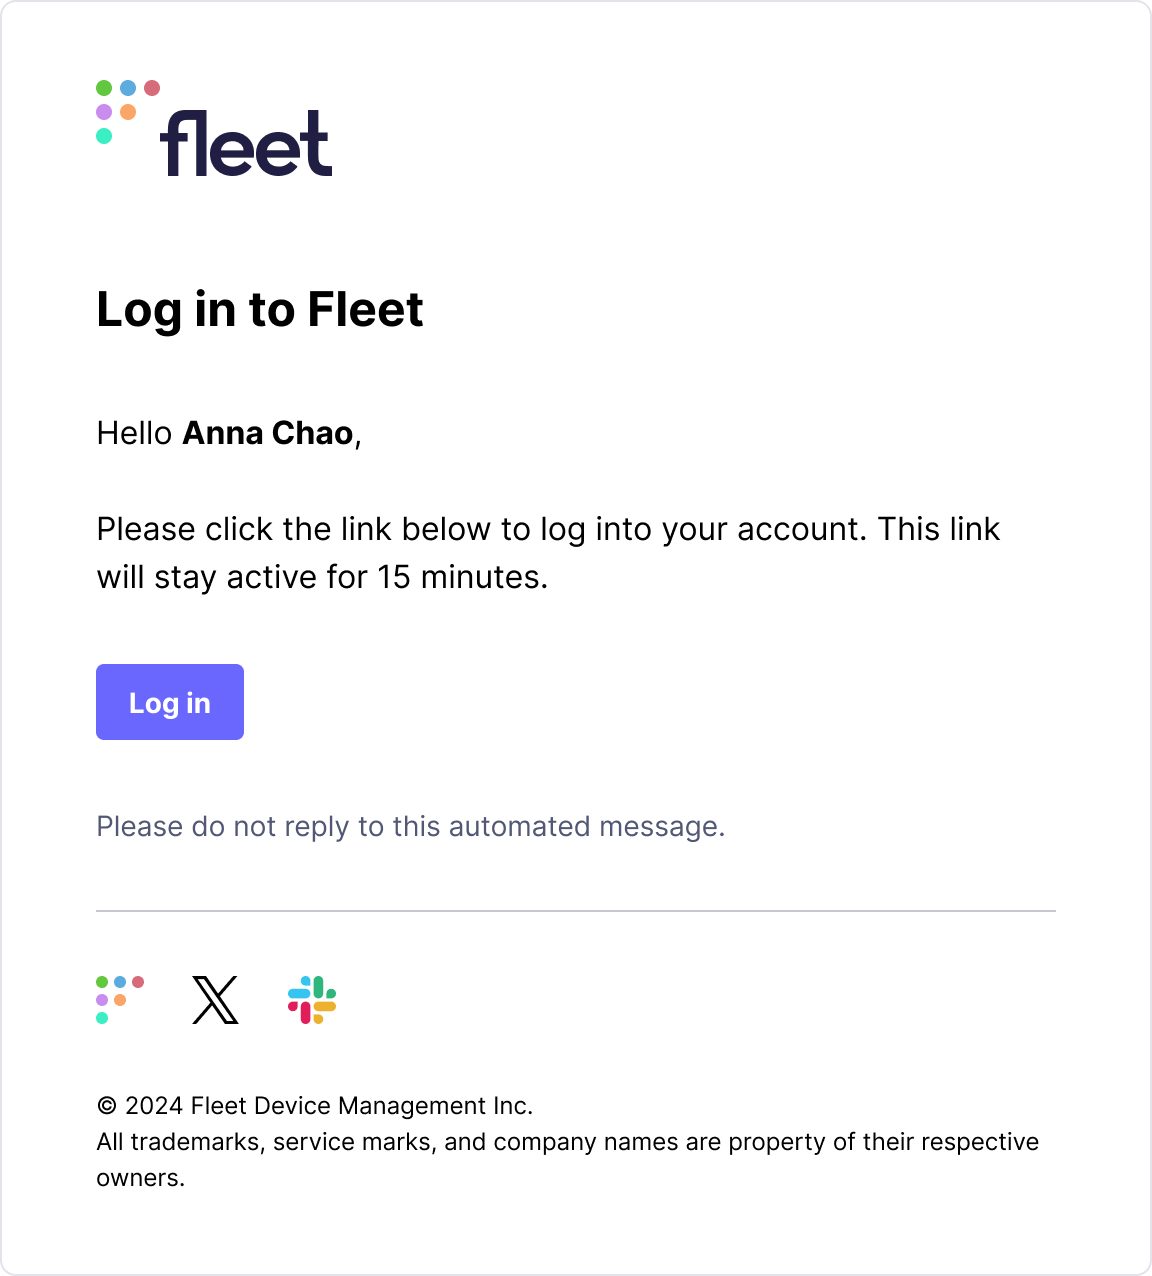
Users with email 2FA enabled will get this email when they login to Fleet:
You can't edit the authentication method for your currently logged-in user. To enable email 2FA for a user, login with a different user who has the admin role and head to Settings > Users.